
So if you have been following
my flickr you'll know I crashed quite a few times recently. *Sad face*
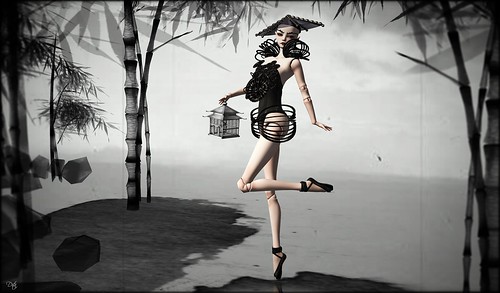 |
| Black Stork I - Finished composition. |
It got so bad that I just decided to abandon that particular set of images instead of re-taking them! However,
as promised I have decided to share a few more techniques I use in my SL photography.
In the last crash, I wrote a little about lighting and so in this "crash course" (hyuk hyuk), I'll share a bit about this idea of 'Camera'
 |
| Original RAW |
Many people have different approaches and philosophies about SL photography and it's all interesting to me. Some people see manipulating photos out of second life from within a third party photo retouching software such as photoshop or gimp, to be 'cheating'. I think, like most things in life - it's all a bit of a grey area. Certainly if your manipulated images are used to promote an item that looks nothing like the actual product itself then I would say that lacks ethics.
For myself, capturing images in second life is only part of the process and it is possible to imagine something further or more than the initial capture. Which brings me to discussing the image below.
Some sims such as
China where these images were initially shot , do not allow the rezzing of objects which can make taking images in them something of a guerrilla affair.
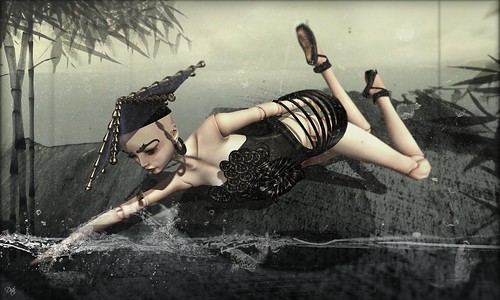 |
| Black Stork II - Finished Composition |
Trying to get a good angle for poses that float your avatar off ground isn't always easy and so that's usually when I make the decision to create a composite image out of a series of images. Thus this blog is really about the infinite capabilities of a virtual 'camera' as limited only by your imagination.
 |
Black Stork II is comprised of three main images.
This is the raw of Dolly Dita on white background. |
 |
| Primary Background RAW image |
 |
| Secondary RAW image element used in foreground |
Quite often in composites, people will take their images on green or blue screens for the purpose of a technique known as
Chroma keying. This is just a way to uniformly mask out a colour in order to replace this mask with a different image. The main rule to bear in mind when applying this technique is to avoid using a mask colour that is repeated in the parts of the image you wish to keep.
My own photoshop techniques come from my own evolving use of the program and while there may be other more efficient ways to achieve the same results, this is how I do it as follows :
How to make a good picture (in second life) :
Part 2 - Mistress/Master your environment
This is a basic tutorial about my technique for compositing an image using White BG with Photoshop CS6
Geekery : I am using Photoshop CS6 extended on a Macbook Pro using a 2.6GHZ Intel Core i7, NVIDIA GT 650M (1GB Video RAM), Running OSX 10.8.5 with a 500GB M4 SSD (Solid State Disk) drive.
 |
| I use a white background mostly because this keeps shadow colours untainted |
 |
Copy your corrected image with full white background onto your background substitute
Then change the layer properties to Multiply. |
 |
| Layer 1 is the selected layer in this image and it has been converted to 'Multiply' |
 |
Create a duplicate of your pasted layer and you can either use
Color Range (From your Select drop down menu)
or Magic Wand to select your unwanted areas.
In this example I've used the Magic Wand Tool. |
 |
In using a white mask, inevitably you will end up selecting highlights which are also white and within range.
Filling these up in Quick Mask enables you to finesse your final image. |
 |
This 'Halo' effect is quite a common result in composites.
When the mask used is not white, I tend to select these bleeders using "replace color" |
 |
Multiply overlays your image onto the background like a transparency/alpha.
Placing a white 'mask' underneath a multiply layer creates an area of solid colour. |
 |
| Unlike erasing surrounding pixels - simply erasing the white mask enables retention of delicate details. |
 |
| Filling in the gaps of your white mask will restore highlights. |
 |
| Your layers should look something like this. |
Production Credits :
Shot @
maps.secondlife.com/secondlife/China/116/179/51
Wearing :
Zibska - Portia Noir (Attachments)
Info:
Portia Noir is exclusive to and part of Zibska's mini collection at the Zenshi location called Zibska Noir. Available starting Saturday 02 November.
maps.secondlife.com/secondlife/Zenshi%20East/219/102/27
Zibska - Severine Earrings
Else :
Donna Flora - TANIA hat by the unforgettable Squinternet Larnia
=Z=Kiosk Birdcage (Blue) Gacha from Chapter Four
Etoile Ballet Shoes.
marketplace.secondlife.com/p/EtoileBallet-Shoes-Black/353...
La Gyo - Baroque Brows Silver (The Arcade Gacha) - Modified by tinting
Doll COCO - BJD with 001V Doll head + Bodysuit Black

Thank you for posting this.... I have steered away from Masks simply because I didn't understand what they were used for and I am going to try this later today. I do have a question, in your final image you have a body of water.... and in many of your images you use a brush (?) for water movement... would you mind sharing where you got these materials to use. I use PSP but am guessing I can make them work.... :)
ReplyDeleteSorry I picked this up kinda.. err late! Lol anyway to your reply. I do not mind sharing at all. It's a commercial brush which I bought from a site for artist resources *does a frantic search in her history* and emerges triumphant. AHHHH - Here is the link : http://www.daz3d.com/rons-waterline :-) I
DeleteTHANK YOU SO MUCH DITA! this is a really useful tutorials!
ReplyDelete