Showing posts with label Fish Eye Lens. Show all posts

Friday, 7 February 2014

The Fish-Eye Lens : Arghs Tutorial IV - Puppet Warp Kungfu.

The Arghs Tutorials : Chapter IV - quick screen capture of the lost file 
The ARGHS tutorial is my way of restoring karmic balance and appeasing the techno-gods with a blog offering of a method byte. Other tutorials are here and this now continues with :

Dita's quick and dirty 

photo retouching/sculpting tutorial 

using Puppet Warp

This is a basic tutorial about my technique for retouching an image with Photoshop CS6 using 'Puppet Warp'

Geekery : I am using Photoshop CS6 extended on a Macbook Pro using a 2.6GHZ Intel Core i7, NVIDIA GT 650M (1GB Video RAM), Running OSX 10.8.5 with a 500GB M4 SSD (Solid State Disk) drive.
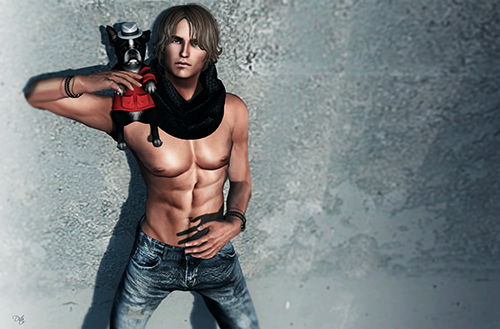
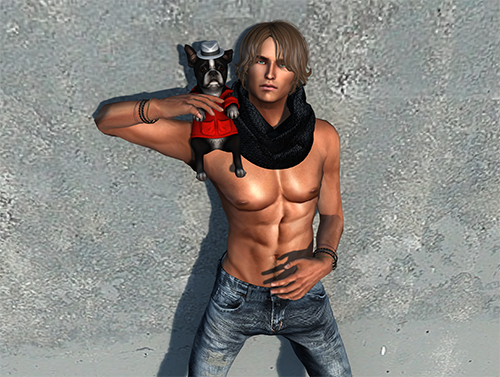
Finished Composition

Original Capture

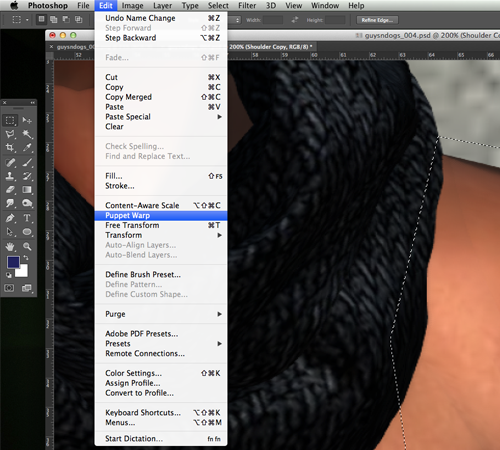
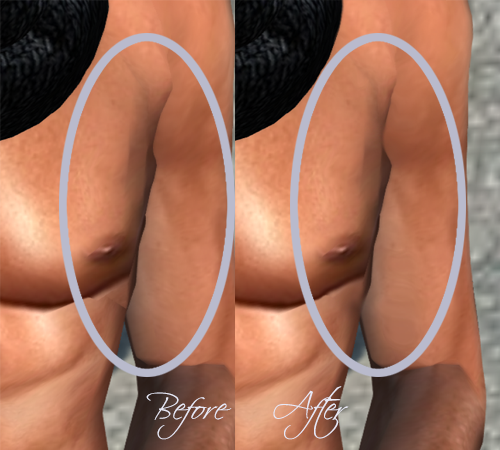
Step 1: After selecting the area you wish to correct,
feather your selection and copy this to a new layer from which to work. Select Puppet Warp from the Edit menu.

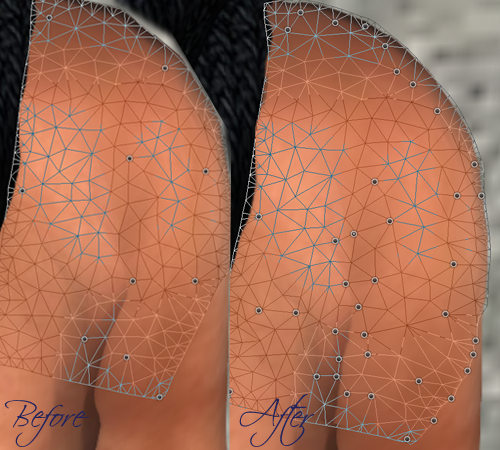
Step 2: Puppet warp will convert the area into a mesh which can be manipulated by placing pins in areas you want to warp/pull/stretch/contract etc.
Start with laying down several anchoring points on your mesh and add more as you need

Step 3 : Using this method, it's possible to 'sculpt' areas and create cleaner perspectives and shading.
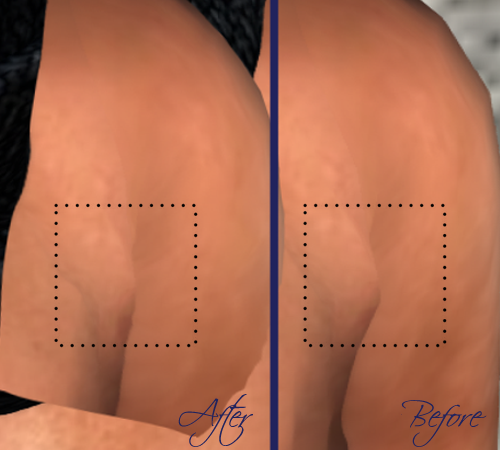
This illustration shows how you can clean up the 'arm pit' area of the original capture
with a more naturalistic 'join' between flesh bodies.

Step 4: Just a little has been done to illustrate the flexibility and power of this tool.
With one  process you are able to correct much of this area where the SL mesh is crude and refine it in post production.


And that is my ARGHS top tip. Hope you enjoyed it!

xxx
D

Tuesday, 5 November 2013

Through a Fish Eye Lens : Black Stork - Production Notes.

Fish Eye Lens Icon So if you have been following my flickr you'll know I crashed quite a few times recently. *Sad face*
Black Stork I - Finished composition.

It got so bad that I just decided to abandon that particular set of images instead of re-taking them! However, as promised I have decided to share a few more techniques I use in my SL photography.

In the last crash, I wrote a little about lighting and so in this "crash course" (hyuk hyuk), I'll share a bit about this idea of 'Camera'

Original RAW
Many people have different approaches and philosophies about SL photography and it's all interesting to me. Some people see manipulating photos out of second life from within a third party photo retouching software such as photoshop or gimp, to be 'cheating'. I think, like most things in life - it's all a bit of a grey area. Certainly if your manipulated images are used to promote an item that looks nothing like the actual product itself then I would say that lacks ethics.

For myself, capturing images in second life is only part of the process and it is possible to imagine something further or more than the initial capture. Which brings me to discussing the image below.
Some sims such as China where these images were initially shot , do not allow the rezzing of objects which can make taking images in them something of a guerrilla affair.
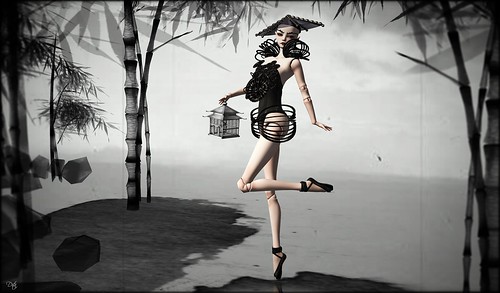
Black Stork II - Finished Composition

Trying to get a good angle for poses that float your avatar off ground isn't always easy and so that's usually when I make the decision to create a composite image out of a series of images. Thus this blog is really about the infinite capabilities of a virtual 'camera' as limited only by your imagination.

Black Stork II is comprised of three main images.
This is the raw of Dolly Dita on white background.
Primary Background RAW image
Secondary RAW image element used in foreground

Quite often in composites, people will take their images on green or blue screens for the purpose of a technique known as Chroma keying. This is just a way to uniformly mask out a colour in order to replace this mask with a different image. The main rule to bear in mind when applying this technique is to avoid using a mask colour that is repeated in the parts of the image you wish to keep.
My own photoshop techniques come from my own evolving use of the program and while there may be other more efficient ways to achieve the same results, this is how I do it as follows :

How to make a good picture (in second life) :

Part 2 - Mistress/Master your environment


This is a basic tutorial about my technique for compositing an image using White BG with Photoshop CS6

Geekery : I am using Photoshop CS6 extended on a Macbook Pro using a 2.6GHZ Intel Core i7, NVIDIA GT 650M (1GB Video RAM), Running OSX 10.8.5 with a 500GB M4 SSD (Solid State Disk) drive.

I use a white background mostly because this keeps shadow colours untainted

Copy your corrected image with full white background onto your background substitute
Then change the layer properties to Multiply.

Layer 1 is the selected layer in this image and it has been converted to 'Multiply'

Create a duplicate of your pasted layer  and you can either use
Color Range (From your Select drop down menu)
or Magic Wand to select your unwanted areas.
In this example I've used the Magic Wand Tool.

In using a white mask, inevitably you will end up selecting highlights which are also white and within range.
Filling these up in Quick Mask enables you to finesse your final image.

This 'Halo' effect is quite a common result in composites.
When the mask used is not white, I tend to select these bleeders using "replace color"

Multiply overlays your image onto the background like a transparency/alpha.
Placing a white 'mask' underneath a multiply layer creates an area of solid colour.

Unlike erasing surrounding pixels - simply erasing the white mask enables retention of delicate details.

Filling in the gaps of your white mask will restore highlights.

Your layers should look something like this.


Production Credits :
Shot @ maps.secondlife.com/secondlife/China/116/179/51
Wearing : Zibska - Portia Noir (Attachments)
Info: Portia Noir is exclusive to and part of Zibska's mini collection at the Zenshi location called Zibska Noir. Available starting Saturday 02 November. maps.secondlife.com/secondlife/Zenshi%20East/219/102/27
Zibska - Severine Earrings

Else : Donna Flora - TANIA hat by the unforgettable Squinternet Larnia
=Z=Kiosk Birdcage (Blue) Gacha from Chapter Four
Etoile Ballet Shoes. marketplace.secondlife.com/p/EtoileBallet-Shoes-Black/353...
La Gyo - Baroque Brows Silver (The Arcade Gacha) - Modified by tinting
Doll COCO - BJD with 001V Doll head + Bodysuit Black

Thursday, 24 October 2013

The Fish Eye Lens : How to make a good picture. (Introduction and so on dedicated to Amita)

Fish Eye Lens Icon

Haha ok so today I crashed and made this capture :
ArghsIII
ARGHS!!!!
Amita Yorcliffe suggested (in a comment) that I make a tutorial on how to take good pictures - she even said the magic word pleaseeee (with four e's!!!!) so how can I say no eh? Truth be told I had been thinking of sharing my processes anyway  to beef up my blog content ;-). This is actually kind of a difficult thing for me to do because I'm really quite a disorganised goldfish brain but I'll try my best !
I think it would be interesting to explore the idea and learn from it too!

I certainly don't claim to be an expert in the field of good picture taking given the wealth of talent in the ole flickr pool; I'm pretty average with the occasional lucky break! With that said - how I'll go about blogging about these techniques is, I'll write a tutorial covering some aspect of SL photo taking whenever a crash has occurred and I need to channel my frustration into something more positive than a major rant!

One thing I do believe in is that there are some basic rules about aesthetics that other more brainy people than me have often theorised and written about. These can be learned and applied in your own projects. What is good is always a matter of opinion and style and these change and develop as you become more experienced. So perhaps the bestest no.1 rule in good picture taking is to take a lot of pictures! The rest is as follows.

How to make a good picture (in second life) :

Part 1 - Mistress/Master your environment (Light)

The essential things you want to control in most picture set ups are
Lights, Camera and Action.
So for this blog tutorial I'll write a little about setting up light sources in second life.

Note : 
Phoenix Firestorm Viewer is my viewer of choice for my own Second Life. Therefore the user interface and settings may vary from your own SL experience.

Lighting in Second Life (The Basics)

This tutorial will cover the following points

  • 1) Planning the set up of your studio/location
  • 2) Making basic lights

1. Planning the set up of your studio/location
While there is no hard and fast rule to setting up your studio,
I find setting up in an East West direction just makes sun/wind light settings easier to understand.  
I will write a blog about my own explorations with windlight settings in a later tutorial.

Briefly, the biggest reason for setting up your studio direction in this illustration, is so that you can use sun position in a controlled manner to create dramatic lighting. If you'd like to get into this straight away - Strawberry Singh has written a wonderful tutorial on windlight settings here


2. Making basic lights
You will need some very basic SL building skills.


You now have a set of photography lights that you can easily modify to suit your needs!